How To Add Simple Elegant Popular Posts Widget In Blogger’s Blog
How To Add Simple Elegant Popular Posts Widget In Blogger’s Blog
Popular Post is very important
part of any blog site because by this widget visitors can easily understand
what the most viewed posts in a particular site are. So I have already shared
some popular post widget earlier and now going to share another popular post
that is simple and elegant. Remember that if you want to load fast your site
then you should use less graphics in your site. So it is a wise decision to
show the popular posts with only posts Title while using images with thumbnail
will make your widget loading slower. So we shell go now to the tutorial that
how to add simple Elegant popular posts in your blog.
Step 1 Log in to your Blogger account and Go to your Blogger Dashboard
Step 2 Go to your Layout tab.
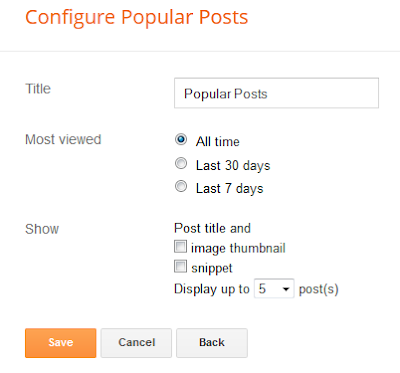
Step 3 Click on "Add a Gadget" then select "Popular Posts" Widget.
Note
- Uncheck image Thumbnail and snippet. Because we will display only popular Post's links so we don't need that bulky image and unnecessary intro text.
- You can display between 1 to 10 posts. So choose at least 5-7 posts.

Step 4 Now Save the "Popular Posts" Gadget.
Step 5 Click on -> Template -> Edit HTML
Step 6 Now Find this code ]]></b:skin> by pressing Ctrl + F
Step 6 Now Find this code ]]></b:skin> by pressing Ctrl + F
Step 7 Paste the below code Before/above ]]></b:skin>
/*---Simple Elegant Popular Posts Widget By www.bloggerspice.com---*/.popular-posts { margin: 10px 0px 5px 0px;}
.popular-posts ul{padding-left:0px; font: normal 13px Arial, Tahoma, Verdana;}
.popular-posts ul li {background: #fff url(https://blogger.googleusercontent.com/img/b/R29vZ2xl/AVvXsEjEGphh_XCEF-NTLFyCGrtAcOw4woTHt32asx_0MwEoO0JsixhdsCY6iTXrKpzf1TaqfzkXhbxfN7ckRfORblGvDzZ-f7qPF0CTctqYYo_fDu9IKbQdg2nxuLQdQquczUt-bCUE8piOorRH/s320/BS+Arrow.www.bloggerspice.com.png) no-repeat 2px;
list-style-type: none;
margin: 0 0 5px 0px;
padding: 5px 5px 5px 30px !important;
border: 1px solid #dddddd;
border-radius: 10px;
-moz-border-radius: 10px;
-webkit-border-radius: 10px;
}
.popular-posts ul li:hover {
background: url(https://blogger.googleusercontent.com/img/b/R29vZ2xl/AVvXsEi1EY9Gtchv2YGQweN6Xd1OtnrAtdqnsAKe5CCmfFudH6aGCTneH6BY4aAwE8QQsESUwWyzGW94oE8gSEaGrUIc1eE2OnXJViyp_k074nfqGKXSxkcnw73mcYFNgBqxSHwd2ANOIi_r0bQ6/s320/BS+Arrow.png) no-repeat 2px;
border: 1px solid #992211;
border-radius: 10px;
-moz-border-radius: 10px;
-webkit-border-radius: 10px;
}
.popular-posts ul li a:hover {
text-decoration:none;
}
/*---Simple Elegant Popular Posts Widget By www.bloggerspice.com---*/
Step 8 Now simply save your template.


Post a Comment