How to Claim and Verify Blogger site in Alexa?
How to Claim and Verify Blogger site in Alexa?
Alexa is an Amazon.com’s company that provides actionable
analytics for the website. Mainly provide information about traffic flow on a
site. Alexa traffic rank is very important for analyzing the site performance. If
you want to take your site in next level then your must work hard on it. But
this is not possible to judge your site performance easily. Because to judge a
site performance you must know the site statistic data, such as how many
visitors are visiting your site, which country's people are randomly visiting
your site? Visitor's age group, gender etc. And to know those all kinds of
staff you must use Alexa Toolbar. In addition Alexa Rank is important for Google SEO. Because higher Alexa ranked Blogger site will get more priority than other low Alexa ranked site.
However just adding toolbar in browser is not enough. Because you have to claim or add your site on Alexa and after that you have to verify your site. But Alexa will not force you to verify your site. So you have to do this by yourself. In this tutorial I will show you how we can claim and verify our Blogger site on Alexa.
Get Site Verification ID from Alexa
However before you proceed should have an Alexa registered
account. But if you didn’t registered yet then register with Alexa site by
visiting http://www.alexa.com/siteinfo link. If you have already Alexa
account then please follow the below steps-
Step 1 Go to http://www.alexa.com/siteinfo
and sign in there.
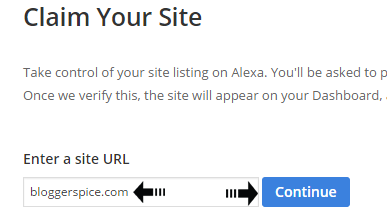
Step 2 Now Press Add My Site button from top right
corner and type your site Name. And press Continue
button.
Step 3 Again copy the http://www.alexa.com/siteowners/claim URL and paste it on your Browser’s
address bar. And hit the Enter button from Keyboard.
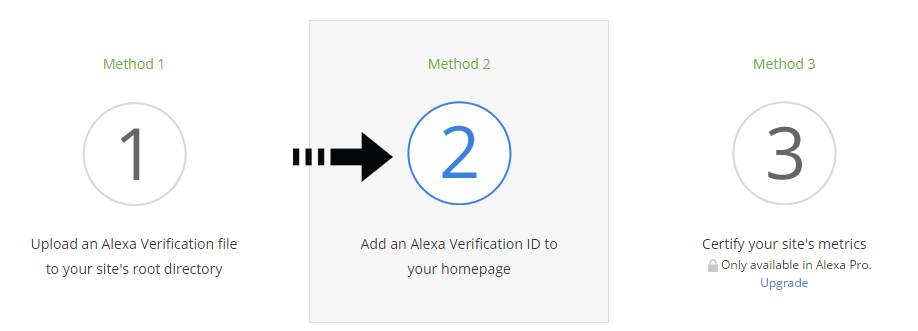
Step 4 This will redirect to site ownership verification page. You
will see there are 3 methods. Easiest way to verify a site with Meta tag. So
select Method 2. You have to just click on Circle
2 by mouse pointer.
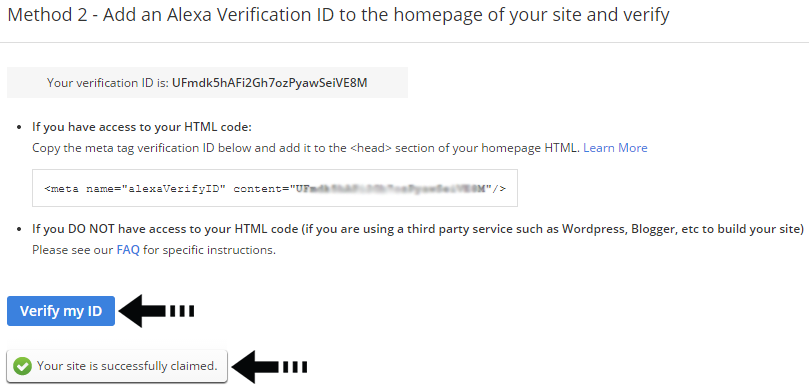
Step 5 Your Site Verification ID will be visible in an Expended
box. Copy that Meta verification code. And don’t click on Verify my ID button until adding the verification ID on your
Blogger site. And don’t close this page.
Adding Site Verification ID in Blogger Template
After that you have to place that Alexa verification Meta code in your Blogger Site. To do this follow the below steps-
Step 1 Log in to
your Blogger Account and Go to your Blogger Dashboard
Step 2 Click on Now
click on -> Template -> Edit HTML
Step 3 Now find
the <head> by pressing Ctrl+F (Windows) or CMD+F (Mac)
Step 4 And Paste the
Alexa Verified code below/After <head>
Step 5 Now hit the Save template button.
Verify the Blogger Site on Alexa
After follow
the above steps you have successfully added the Alexa verified ID on your Blog
site. But now you have to do the main task. In above I was told you to don’t click on Verify my ID button from Alexa site until adding the verification
ID on your Blogger site. So now you have added the Alexa verification ID and
follow the below steps
Step 1 Go back on Alexa page and click on Verify my ID button.
Step 2 After short auto process Your site is successfully claimed message will display below Verify my ID button. That means your
site has successfully claimed on Alexa. And Alexa will analyze your site about site
traffic.
Remember
that Less Alexa counts less point is good rank and more point is bad rank. Suppose your site rank is 100,000 then this
is good rank, but if your site rank got 80,000 then this is better rank than
before.
Another
think you have to note that for getting Historical data for site rank your
Alexa rank must have below 100,000 otherwise Alexa won’t show you details
information.


7 comments
Hello, i read your blog occasionally and i own a similar one and i was just wondering
if you get a lot of spam feedback? If so how do you
prevent it, any plugin or anything you can recommend?
I get so much lately it's driving me crazy so any help is very much appreciated.
me. Is anyone else having this issue or is it a issue on my end?
I'll check back later and see if the problem still exists.
http://www.0daymp3.net
Its very well written; I love what youve got to say. But maybe you could a little more in the way of content so people could connect with
it better. Youve got an awful lot of text for only having one or 2 images.
Maybe you could space it out better?
http://www.0daymp3.net
I think the admin of this site is genuinely working hard in support of his website, for the reason that
here every data is quality based data.