Verifying Domain by Meta Tag in Blogger from Webmaster Central
Verifying Domain by Meta Tag in Blogger from Webmaster Central
After
mapping custom domain the next step is verifying your domain. Because without
verify you site won't be trustable to Google. In addition without verification
you can't able to use Google Apps for your Domain. So this is a compulsory
procedure for making your Blog better. There are many ways we can verify our
Domain, but among them the most easiest way for verifying domain by adding Meta
Tag.
Generally
we have to add <meta> tag to the <head> section of your website's
home page is one way to verify domain ownership and activate Google Apps for
your domain. To do this you have to have access on your site. Meta tag is
mostly popular for content management system where user doesn't have direct
access to HTML and system won't allow upload. So alternatively they use Meta
tag verification method.
I will show you how we will verify our domain
from Google Webmaster Central? For verifying you Domain by using Meta Tag
following tutorial might be helpful for you.
Step 1 Go to
https://www.google.com/webmasters/verification/home and sign in to your Blogger Account.
Step 2 If you have multiple Blog then you will see the list
of verified and Unverified Blog.
So Select Unverified Blog from list. You will see a link message Verify this site so click on there. Alternatively
you can click on ADD A SITE red
color button to add new domain that is not listed below.
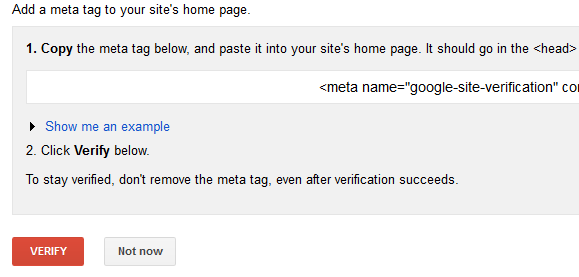
Step 3 You will be redirected to Google's recommended HTML tag verification method page. Now copy
the meta tag from the tag code box. And leave that page but don't close.
Step 4 Now go to
your Blogger account
Step 5 From Blogger
Dashboard Click on -> Template -> Edit HTML
Step 6 Now locate <head> by
Pressing Ctrl+F (Windows) or CMD+F (Mac)
Step 7 And Paste the copied
the meta tag after/below <head> And click on Save Template button.
Step 8 Now again get back to
meta tag verification page on Google
webmaster central. You have to wait
minimum 5 minutes before site verification. After that click on red color VERIFY
button.
Step 9 Now Google prompt
to check for the <meta> tag on your site's home page. Once they find the
tag, they will activate service for your domain. Note that this might take 5
minutes to 1 hour an hour If Google don't find the tag immediately in your Blog
site, but Google will check for the meta tag periodically. If everything is ok then you will
see a success message with Congratulations. That means your site has
successfully verified by Google. And now click on Continue text link for
entering into your Webmaster tools.
But if verification failed or you did
something wrong then it will show message like below--
Verification failed for http://www.yourdomain.com/ using the Meta tag method (less than a minute ago). Your meta tag is incorrect. Are you using a meta tag for a different site or user account?
However failure first time in
verification you don't have to worry because you can try again and again. So
until verification get success do it periodically.


3 comments