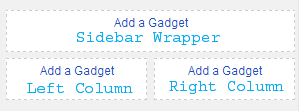
How to Add Elements and split under Blogger Sidebar?
How to Add Elements and split under Blogger Sidebar?
Often we see many blogger
template contain that split sidebar that helps the blogger to add Blogger labels
vertically or we can easily add 160px X 600px Ad unit. So this is very
effective for blogger to save space. Because if you don't split sidebar and add
any widget then it will occupy the whole space. Adding element (add a gadget) under the existing
sidebar is very simple trick. If you are well known about blog coding then understanding
the code will be much easier. So I am sharing with you the trick that will help
you to split your current blogger sidebar into 2 column. just follow the simple
steps from below.
Step 1 Log in to your
blogger account and Click on Template ->
Step 2 Now click on Edit HTML-> Unfold code ►
Step 3 Now find like below code by Pressing Ctrl + F
#sidebar-wrapper {
width: 300px;
float: $startSide;
word-wrap: break-word; /* fix for long text breaking sidebar float in IE */
overflow: hidden; /* fix for long non-text content breaking IE sidebar float */
}
Note that sidebar-wrapper width may 280px, 300px or 310px
or any other number so don't worry. just focus on Sidebar-Wrapper.
Step
4 And now replace the code
by below code.
#sidebar-wrapper {
width:320px;
float:right;
font-family:Oswald,Georgia,Verdana,Geneva,Sans-serif,Arial,Helvetica;
margin:10px auto;
word-wrap:break-word;
overflow:hidden;
padding:0.5% 0;
}
Step 5 Now
add the below code after above code (from Step 4)
#Spice-left{
width:50%;
float:left;
font-family:Oswald,Georgia,Verdana,Geneva,Sans-serif,Arial,Helvetica;
word-wrap:break-word;
overflow:hidden;
}
#Spice-right{
width:50%;
float:right;
font-family:Oswald,Georgia,Verdana,Geneva,Sans-serif,Arial,Helvetica;
word-wrap:break-word;
overflow:hidden;
}
Step 6 Now
find the code like below
<div id='sidebar-wrapper'>
<b:section class='sidebar' id='sidebar' preferred='yes'>
</b:section>
</div>
Step 7 Finally
add the below code after </b:section>
<b:section class='sidebar' id='Spice-left' preferred='yes'/>
<b:section class='sidebar' id='Spice-right' preferred='yes'/>
The final code will be look like below-
<div id='sidebar-wrapper'>
<b:section class='sidebar' id='sidebar' preferred='yes'>
</b:section>
<b:section class='sidebar' id='Spice-left' preferred='yes'/><b:section class='sidebar' id='Spice-right' preferred='yes'/></div>
Now check your blog layout view and see that your blog
sidebar has split into 2 column. There
are some optional step which you may use from below.
Optional Step
If you wish to fix your new splited elements under sidebar
according to your blog widget setting then please add the below code after the
code from Step 5 .
#Spice-left .widget-content{
margin:3px 3px 3px 3px;
word-wrap:break-word;
overflow:hidden;
}
#Spice-left li,.column li {
line-height: 18px;
padding: 3px 10px;
text-decoration: none;
}
#Spice-left ul{
margin:0;
padding:0;
list-style:none;
}
#Spice-right .widget-content{
margin:3px 3px 3px 3px;
word-wrap:break-word;
overflow:hidden;
}
#Spice-right li,.column li {
line-height: 18px;
padding: 3px 10px;
text-decoration: none;
}
#Spice-right ul{
margin:0;
padding:0;
list-style:none;
}
#Spice-left h2{Width:90%;color:#252525;padding:5px 0 5px 10px;;margin bottom:10px;position:relative;border-bottom:2px solid #252525;}
#Spice-right h2{Width:90%;color:#252525;padding:5px 0 5px 10px;margin-bottom:10px;position:relative;border-bottom:2px solid #252525;}
#sidebar h2{color:#252525;font-family:Oswald,Georgia,Verdana,Geneva,Sans-serif,Arial,Helvetica; padding:6px;margin-bottom:10px;position:relative;border-bottom:2px solid #252525;}
If you have any problem then feel free to contact with
me. I will reply you as soon as possible.


1 comment