Comment Plugin: Integrate Disqus Comment System in Google Blogger
Comment Plugin: Integrate Disqus Comment System in Google Blogger
Google Blogger commenting system is very
simple which is doesn't like by most of the webmaster. But still this
commenting system is very popular among many users. So webmaster always think
of alternative commenting system that can make commenting system more
attractive. However many commentator don't feel interest to make comment on
Google default commenting system. So it's better decision to integrate any
third party attractive commenting system in our Google blog to make it more
attractive.
When it comes to in the matter of third party
comment Disqus is very popular to everybody. There are millions of blogger
using this commenting system only for one reason because you can resist spam
from blogger comments by Disqus. In addition Disqus support various API
integration (Facebook, Twitter, Google, Open URL) as well as Disqus registered
users can comment by log into their personal account. Moreover, if any users
share blog links to get backlink then s/he won't able to get from Disqus
commenting system. But you can modify all comment whether publish or not.
Disqus comment plugin is very easy to setup
but you have to register with Disqus first then you have to proceed for
installation into your blog.
After installing Disqus comment plugin
it will override all of your existing comments
How to Integrate Disqus Comment system in Google Blogger?
For integrating Disqus comment plugin just follow the below steps-
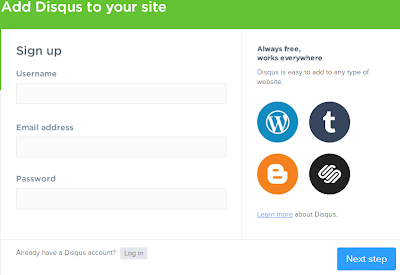
Step 1 Go to http://disqus.com and click on Add Disqus to your Site
Step 2 Instantly a new
registration form will appear on the screen, then fill up the form
Step 3 Write User
Name, Email
Address and Password and
simply click on Next Step button from bottom right corner.
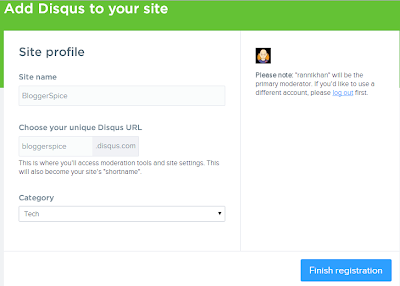
Step 4 Now another new page will
open and write there Site name, Under Choose your unique Disqus
URL write
your blog name and select your Blog or
website category. And hit the Finish registration button from bottom right
corner of the screen.
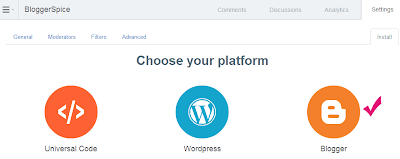
Step 5 Now a new window will
appear with message Choose your platform. simply select Blogger from the list for proceeding to the next
step.
Step 6 A Popup page will appear
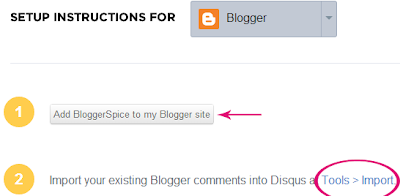
with 2 option select the second option Add "Your Site Name" to my Blogger site simply click on that button.
Step 7 It will headed to Add
Page Element page, From there select your blog and Click on Add
Widget and it
will help you to successfully install the Discus comment on your Blog.
Importing Old Comments from previous platform
If you are running
blog age is few months or years then you may got many comments. Most of the
Blogger don't want to lose old comment. There is a good news for Discus comment plugin user that you won't lose your old comment
because you can easily transfer the older comments on Discus comment
plugin. So follow the below steps and this
will help to import comments from your previous platform. Just follow the below
steps-
Step 1 Now return to the step 6 which will exists in your
browser's tab.
Step 2 And Click on Import your existing Blogger Comments into Disqus at Tools ->
Import and
proceed to the next step.
Step 3 Now from One-time Import click on Import comments from Blogger button.
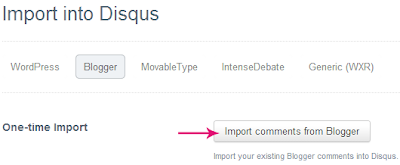
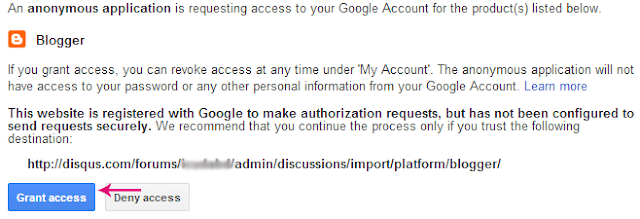
Step 4 it will headed to a new page where it will
seek permission for accessing your blog's data. Just click on Grant Access button.
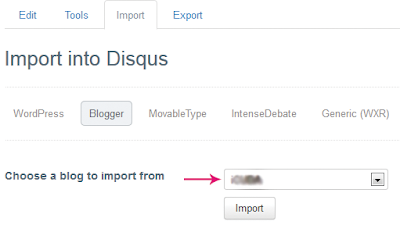
Step 5 Your page now return on previous page. Now under Import
into Disqus you would find a option written Choose a blog to import from select
your blog by clicking on drop down menu and simply hit the Import button.
Step 6 Now a message will appear that Your
import has been successfully uploaded and queued. We'll email you when your
import has completed. It will take some hour to import your comments
completely.
Congratulations,
Disqus comment plugin is now
successfully integrated into your Blogger enabled website. And you can easily
use spam free commenting system on blogger platform. If you have any query or facings
any trouble then feel free to leave a comment below.



3 comments
Note: Don't forget to change EXAMPLE to your forum's shortname.
<div id="disqus_thread"></div>
<script>
/**
* RECOMMENDED CONFIGURATION VARIABLES: EDIT AND UNCOMMENT THE SECTION BELOW TO INSERT DYNAMIC VALUES FROM YOUR PLATFORM OR CMS.
* LEARN WHY DEFINING THESE VARIABLES IS IMPORTANT: https://disqus.com/admin/universalcode/#configuration-variables
*/
/*
var disqus_config = function () {
this.page.url = PAGE_URL; // Replace PAGE_URL with your page's canonical URL variable
this.page.identifier = PAGE_IDENTIFIER; // Replace PAGE_IDENTIFIER with your page's unique identifier variable
};
*/
(function() { // REQUIRED CONFIGURATION VARIABLE: EDIT THE SHORTNAME BELOW
var d = document, s = d.createElement('script');
s.src = '//EXAMPLE.disqus.com/embed.js'; // IMPORTANT: Replace EXAMPLE with your forum shortname!
s.setAttribute('data-timestamp', +new Date());
(d.head || d.body).appendChild(s);
})();
</script>
<noscript>Please enable JavaScript to view the <a href="https://disqus.com/?ref_noscript" rel="nofollow">comments powered by Disqus.</a></noscript>
Configuration variables
Within the above embed code, there are configuration variables which tell Disqus how the system should work and behave.
EXAMPLE is your "shortname" and should be replaced to tell Disqus which website account (called a forum on Disqus) this system belongs to.
this.page.url tells Disqus how to uniquely identify the current page.
this.page.identifier tells Disqus the location of the page for permalinking purposes.