How to apply schedule post feature in WordPress Blog
tutorial for schedule post in WordPress blog
Schedule post is really a cool idea if you don't have time to
make post frequently then you can scheduled your post which will help you to
publish your post automatically in your desired time. Sometime we go for travel
and at that case we don't have time to make post. In addition in exam time we
are unable to make new post. So we can publish our post in schedule time by
using schedule post feature in WordPress.
Most of the beginners don't know about this feature. To do
this you can write couple of article in advance and then add it in WordPress
Writing panel and publish by scheduled preset time. Your schedule articles will
be publish automatically which is really a cool feature.
So this feature is really useful and solve our problem. You
can also save time from daily bog posting.
Now I will explain the tutorial to apply schedule post
feature in WordPress Blog. Please follow the below steps carefully.
Step 1 Sign
in to your WordPress account and from Dashboard Click on Posts-> Add New
Step 2 Now complete your post writing but don't hit the Publish button.
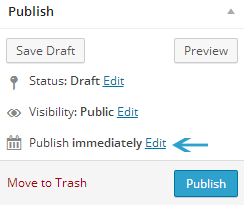
Step 3 Find
Publish
immediately option right Above Publish
button and click on Edit link beside
Publish
immediately text.
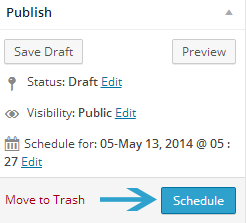
Step 4 Now set
the time & date and click on Ok
Button.
Step 5 And finally click on Schedule button.
Step 6 To check the schedule post click on All Post from top left side of the
screen. and see the post is showing Scheduled
with date and time.
If you have followed all the above steps then it will help
you to successfully scheduled your post in WordPress Blog.
Better schedule time if morning. Because loyal readers can
read your article when they first connected to the Internet. So try to set
schedule time between 7 A.M to 8 A.M. If you have any query regarding schedule post then feel free to leave a comment below. And kindly Like our Facebook
page.


Post a Comment