How to install WordPress Default Themes?
How to install WordPress default themes from dashboard
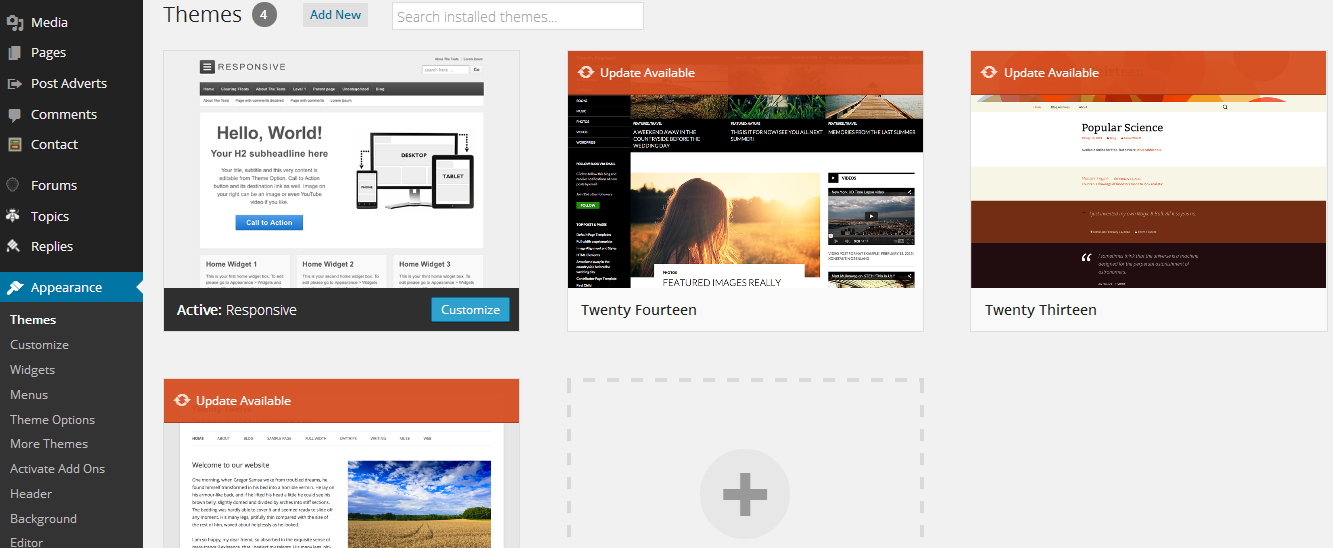
After installing WordPress you
will see a default theme name Responsive
that will automatically install on your WordPress site. This is one of default
WordPress theme. However you have more 3 default theme which you can install on
your WordPress site. That means WordPress site will provide you 4 default
themes.
- Responsive
- Twenty Fourteen
- Twenty Thirteen
- Twenty Twelve
However you can find many free
and paid themes over the net. Today I will show you how we can install
WordPress default theme on our site.
Recommended: WordPress Login Tips and Hacks
Recommended: WordPress Login Tips and Hacks
Step 1 Log in to
your WordPress account and go to Dashboard
Step 2 Click on ->Appearance
->Themes you will see 4 default
themes on screen.
Step 3 Now mouse over on any theme preview and
click on Activate button.
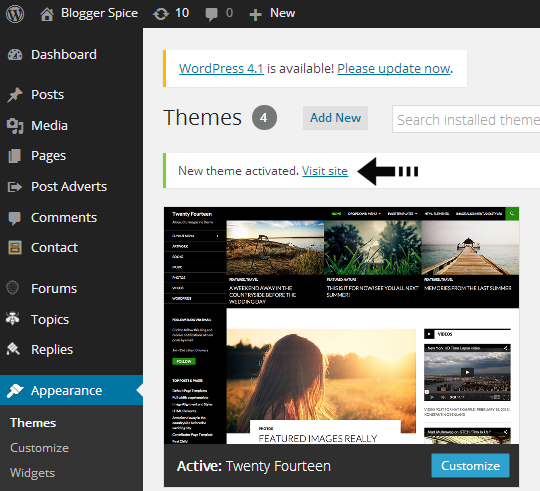
Step 4 Your theme will be activate now. And click on Visit Site link to view the theme on live.
Alternative way to activate WordPress default theme
There are another way you can
apply WordPress default theme on your site. In this process you can view the themes
full information and after that you can apply the new theme in your WordPress
site.
Step 1 Log in to
your WordPress account and go to Dashboard
Step 2 Click on ->Appearance
->Themes
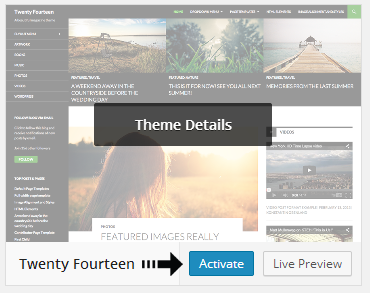
Step 3 Now mouse over on any theme preview and
click on Theme Details button.
Step 4 Now click on Activate button from bottom of the page. If you want you can see
the live
preview of the theme by clicking on Live Preview button from bottom of the page.
After activating the WordPress
default theme visit your site to see the theme in live. You can visit your site
by clicking on Visit Site link form
WordPress dashboard. Just mouse over on your site Name and click on Visit Site link from top left corner of
WordPress dashboard.
If you have any query regarding this you can leave a
comment below.


Post a Comment