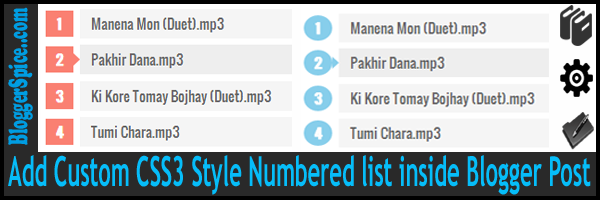
Add Custom CSS3 Style Numbered list inside Blogger Post
Add Custom CSS3 Style Numbered list inside Blogger Post
List style means numeric
serial that can be used in Blog post. Generally by default Blog has list style
option where by selecting two or more line if we click on List option then it
will automatically add the serial number per line. This option is most popular
on Template Blog as well as Music Blog where massively use for listing the
template feature or Mp3 track list.
Generally in music blog we see
the track list with manual list but it is hard to add serial number per line if
we randomly create post. But the solution is to use List style widget that will
help you to add serial number per line by one click.
However default list style
widget is not appealing or stylish and it can’t able to attract visitor. For
this reason I am sharing tutorial that will help you to add CSS3 ordered list
style with hover effect. For different choice of readers I have designed 2
style. You can easily use any CSS3 numbered list style.
1. CSS3 ordered list Rectangle style for Blogger
For integrating CSS3 ordered list Rectangle style in your
Blogger template please follow the below steps-
Step 1 Log in to your Blogger Account and Go
to your Blogger Dashboard
Step 2 Click on Now click on -> Template -> Edit
HTML
Step 3 Now find
the </b:skin> by pressing Ctrl+F
Step 4 Copy the code from below and Paste the code
above/before </b:skin>
/* CSS3 ordered list Rectangle style by www.bloggerspice.com */
ol {counter-reset:li;list-style: none;font:15px 'Roboto Condensed', 'Oswald';
padding:0;margin-bottom:4em;text-shadow: 0 1px 0 rgba(255,255,255,.5);}
ol ol {margin: 0 0 0 2em;}
.post ol li{position:relative;display:block;padding:.4em .4em .4em .8em;
margin:.5em 0 .5em 2.5em;background:#F5F5F5;color:#666;text-decoration:none;
transition:all .3s ease-out;}
.post ol li:hover{background:#EEEEEE;}
.post ol li:before{content:counter(li);counter-increment:li;position:absolute;
left:-2.5em;top:50%;margin-top:-1em;background:#FA8072;color:#FEFEFE;height:2em;width:2em;
line-height:2em;text-align:center;font-weight:bold;}
.post ol li:after{position:absolute; content:'';border: .5em solid transparent;
left:-1em;top:50%;margin-top:-.5em;transition:all .3s ease-out;}
.post ol li:hover:after{left:-.5em;border-left-color:#FA8072;}
.post ol li span{position:relative;display:block;padding:5px 8px;margin-bottom:10px;background:#fafafa;color:#666;text-decoration:none;transition:all .3s ease-out;}
.post ol li span:hover{background:#f9f9f9;}
Step 5 Finally hit the Save template button.
Customization
- To change the serial color just change color code #FA8072 only from code block. You can avail the different color from our Color Picker.
2. CSS3 ordered list Rounded style for Blogger
For integrating CSS3 ordered list Rounded style in your
Blogger template please follow the below steps-
Step 1 Log in to your Blogger Account and Go
to your Blogger Dashboard
Step 2 Click on Now click on -> Template -> Edit
HTML
Step 3 Now find
the </b:skin> by pressing Ctrl+F
Step 4 Copy the code from below and Paste the code
above/before </b:skin>
/* CSS3 ordered list Rounded style by www.bloggerspice.com */
ol {counter-reset:li;list-style: none;font:15px 'Roboto Condensed', 'Oswald';
padding:0;margin-bottom:4em;text-shadow: 0 1px 0 rgba(255,255,255,.5);}
ol ol {margin: 0 0 0 2em;}
.post ol li{position:relative;display:block;padding:.4em .4em .4em .8em;
margin:.5em 0 .5em 2.5em;background:#F5F5F5;color:#666;text-decoration:none;
transition:all .3s ease-out;}
.post ol li:hover{background:#EEEEEE;}
.post ol li:before{content:counter(li);counter-increment:li;position:absolute;
left:-2.5em;top:50%;margin-top:-1em;background:#87CEEB;color:#FEFEFE;height:2em;width:2em;border-radius: 30px;
line-height:2em;text-align:center;font-weight:bold;}
.post ol li:after{position:absolute; content:'';border: .5em solid transparent;
left:-1em;top:50%;margin-top:-.5em;transition:all .3s ease-out;}
.post ol li:hover:after{left:-.5em;border-left-color:#87CEEB;}
.post ol li span{position:relative;display:block;padding:5px 8px;margin-bottom:10px;background:#fafafa;color:#666;text-decoration:none;transition:all .3s ease-out;}
.post ol li span:hover{background:#f9f9f9;}
Step 5 Finally hit the Save template button.
Customization
- To change the serial color just change color code #87CEEB only from code block. You can avail the different color from our Color Picker.
How to use this List style widget in Blogger Blog Post?
To this widget first of all you have to create or Edit
your Blog post. Now complete your necessary writing. For example you want to
write a Music album track list. And there are 8 track so the song list will be
in 8 line.
Simply block the whole 8 line and click on Numbered list from Blogger tools menu.
That’s it. Now your track list will display with attractive customized serial
number. By mouse over on list you will see the hover effect.
If you have any query regarding this tutorial or need
further support then feel free to leave a comment below.


7 comments
Thank you so much. obiyshinichiart.blogspot*com
Search the below code
.post ol li{position:relative;display:block;padding:.4em .4em .4em .8em;
margin:.5em 0 .5em 2.5em;background:#F5F5F5;color:#666;text-decoration:none;
transition:all .3s ease-out;}
and now replace the above code with the below code:
.post ol li {
position: relative;
display: block;
padding: 0.4em 0.4em 0.4em 0.8em;
margin: 0.5em 0 0.5em 2.5em;
background: #F5F5F5;
color: #666;
text-align: right;
text-decoration: none;
transition: all .3s ease-out;
}
Now again search the below code
.post ol li:before{content:counter(li);counter-increment:li;position:absolute;
left:-2.5em;top:50%;margin-top:-1em;background:#FA8072;color:#FEFEFE;height:2em;width:2em;
line-height:2em;text-align:center;font-weight:bold;}
and now replace the above code with the below code:
.post ol li:before {
content: counter(li);
counter-increment: li;
position: absolute;
right: -2.5em;
text-align: right;
top: 50%;
margin-top: -1em;
background: #FA8072;
color: #FEFEFE;
height: 2em;
width: 2em;
line-height: 2em;
text-align: center;
font-weight: bold;
}
And save the theme. It will work.