Boxed Style Popular Post Widget with Image Rotate Effect
Boxed Style Popular Post Widget with Image Rotate Effect
Almost 99% Blogger Blog
use Popular post widget, This is a great widget to show off the visitors which
post exactly popular in their site. This is a Blogger default widget but by
customizing we can give it different shape. Though there are many widget developer
customize this widget in different way. But the main problem is about popular
post image. Because If you want to resize the image size then it will become
blur. So the solution is JavaScript with CSS coding. Now you can able to
increase your popular post image in any size. I hope this new Boxed style popular
will love your visitors. Actually this style is perfect for multimedia type
blog. Also can be used those who are Blogging for template distribution. Anyway
just follow the below steps for adding this widget
Step 1 Log in to your Blogger account and Go to your Blogger Dashboard
Step 2 Go to your Layout tab.
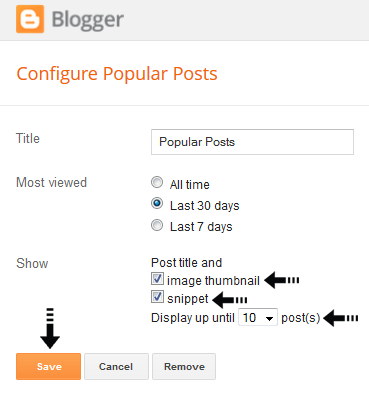
Step 4 In configuration window
check image thumbnail and snippet
option. And set the number of posts that you want to display.
Step 5 Now click on Save
button.
Step 6 Now go to Click on -> Template -> Edit HTML
Step 7 Now Find this code ]]></b:skin> by pressing Ctrl+F (Windows) or CMD+F (Mac)
Step 7 Now Find this code ]]></b:skin> by pressing Ctrl+F (Windows) or CMD+F (Mac)
Step 8 Paste the below code Before/above ]]></b:skin>
/*widget by www.bloggerspice.com */
.PopularPosts .quickedit > img {
height: 19px !important;
width: 22px !important;
}
.PopularPosts li .item-thumbnail {
height:140px;
width:102%;
margin-bottom: 10px;
z-index:1;
overflow:hidden;
}
.PopularPosts li .item-thumbnail img {
height:140px;
width:102%;
margin-bottom: 10px;
z-index:1;
overflow:hidden;
}
.PopularPosts .item-title {
font-family: 'Archivo Narrow', Sans-Serif;
font-size:15px;
font-weight:700;
margin-bottom:-4px!important;
text-shadow:0 1px 0 #fff
}
.PopularPosts li .item-title a {
color: #333;
}
.PopularPosts li .item-title a:hover {
color: #555;
}
.PopularPosts li .item-snippet {
font-size: 13px;
line-height: 1.5em;
margin:0px;
font-family:'arial', Sans-Serif;
color: #7e7e7e;
}
.PopularPosts .widget-content {
padding:12px;
}
.popular-posts li {
padding:10px 0px 10px 0px!important;
border-bottom:1px solid #E9E9E9;
overflow:hidden
}
.popular-posts li:first-child {
padding:0px 0px 10px 0px!important;
overflow:hidden
}
.popular-posts li:last-child {
padding:10px 0px 0px 0px!important;
border-bottom:0px solid #E9E9E9!important;
overflow:hidden
}
.PopularPosts li .item-thumbnail img {
-webkit-transition:all .4s ease-in-out;
-moz-transition:all .4s ease-in-out;
-o-transition:all .4s ease-in-out;
-ms-transition:all .4s ease-in-out;
transition:all .4s ease-in-out;
}
.PopularPosts li .item-thumbnail img:hover {
opacity:.8;
-webkit-transform:scale(1.1) rotate(-2deg);
-moz-transform:scale(1.1) rotate(-2deg);
-ms-transform:scale(1.1) rotate(-2deg);
transform:scale(1.1) rotate(-2deg);
}
Step 9 Now Find this code </body> by
pressing Ctrl+F (Windows) or CMD+F (Mac)
Step 10 Paste the below code Before/above </body>
<script type='text/javascript'>//<![CDATA[function resizeThumb(c,d){for(var b=document.getElementById(c).getElementsByTagName("img"),a=0;a<b.length;a++)b[a].src=b[a].src.replace(/\/s72\-c/,"/s"+d+""),b[a].width=d,b[a].height=d}resizeThumb("PopularPosts1",300);var newSize=300;$(".popular-posts .item-thumbnail img").each(function(){var c=$(this).attr("width");$(this).attr("width",newSize);$(this).attr("height",newSize);$(this).attr("src",$(this).attr("src").replace("/s"+c+"-c/","/s"+newSize+"-c/"))});//]]></script>
Now check your template to see the boxed style popular
post widget. Remember that without JavaScript the image will be look blur. So
regarding this if you have any more query then feel free to write me. Thanks.


1 comment