Add Simple Pre code with Font Awesome in Blogger Site
Add Simple Pre code with Font Awesome in Blogger Site
Pre code is massively used
instead of Blockquote in Blogger site. Many blogger prefer to use pre because
this is SEO friendly. But for using pre
code you must add big chunk of code in your Blog and sometimes it affect the
loading time. But there are always an alternative way exists. So In this
tutorial I will show you about adding simple pre code with Font Awesome icons. This
looks professional. And you can serve your widget code in different ways.
By using monotonous
blockquote just you can wrap your code and serve to your visitors simply but
most of the blockquote design is not eye-catching. And block is used for
highlighting quote only but most of the blogger use it for presenting their
code. However we can highlight out widget code professional way by wrapping it
within pre code.
This pre code has some
unique feature such as –
- You can specify the CSS, HTML and JavaScript file
- Your code will display in professional way.
- Pre code is always error free and SEO friendly.
- Widget code will be highlighted in different color.
- User can easily select the script by double click on pre code block.
So after knowing the
benefit of pre code you might feel interest to add this feature in your Blogger
template. For adding this feature just follow the below steps-
Though this widget is
powered by Font Awesome 4.3.0 version so first you have to add Font Awesome
file in your Blogger Template.
Step 1 Go
to https://www.blogger.com and Sign in to your account
Step 2 From Blogger
Dashboard click on ->Template ->Edit HTML
Step
3 And locate the <head> section
in your Blogger template
Step
4 Finally copy following markup
line and paste it below <head>
<link href='//netdna.bootstrapcdn.com/font-awesome/4.3.0/css/font-awesome.min.css' rel='stylesheet'/>
Step 5 Now find the ]]></b:skin> by
pressing Ctrl+F (Windows) or CMD+F (Mac)
Step 6 Copy and Paste below code above/before ]]></b:skin>
/* CSS Pre Code by www.bloggerspice.com*/
pre {
    background: #444444;
    white-space: pre;
    word-wrap: break-word;
    overflow: auto;
}
pre.code {
    margin: 20px 25px;
    border-radius: 4px;
    border: 1px solid #292929;
    position: relative;
}
pre.code label {
    font-family: sans-serif;
    font-weight: bold;
    font-size: 80%;
    color: #3C99F9;
    position: absolute;
    left: 1px;
    top: 15px;
    text-align: center;
    width: 60px;
    -webkit-user-select: none;
    -moz-user-select: none;
    -ms-user-select: none;
    pointer-events: none;
}
pre.code code {
    font-family: "Inconsolata","Monaco","Consolas","Andale Mono","Bitstream Vera Sans Mono","Courier New",Courier,monospace;
    display: block;
    margin: 0 0 0 60px;
    padding: 15px 16px 14px;
    border-left: 1px solid #555;
    overflow-x: auto;
    font-size: 13px;
    line-height: 19px;
    color: #ddd;
}
pre::after {
    content: "double click to selection";
    padding: 0;
    width: auto;
    height: auto;
    position: absolute;
    right: 18px;
    top: 14px;
    font-size: 12px;
    color: #ddd;
    line-height: 20px;
    overflow: hidden;
    -webkit-backface-visibility: hidden;
    transition: all 0.3s ease;
}
pre:hover::after {
    opacity: 0;
    visibility: visible;
}
pre.css code {
    color: #4899CE;
}
pre.html code {
    color: #EF662A;
}
pre.javascript code {
    color: #F4C22B;
}
Step 7 Now find
the </body> by pressing Ctrl+F (Windows) or CMD+F (Mac)
Step 8 And Copy and Paste below code above/before </body>
Step 8 And Copy and Paste below code above/before </body>
<script type='text/javascript'>
$('i[rel="pre"]').replaceWith(function() {
    return $('<pre><code>' + $(this).html() + '</code></pre>');
});
var pres = document.querySelectorAll('pre,kbd,blockquote');
for (var i = 0; i < pres.length; i++) {
  pres[i].addEventListener("dblclick", function () {
    var selection = getSelection();
    var range = document.createRange();
    range.selectNodeContents(this);
    selection.removeAllRanges();
    selection.addRange(range);
  }, false);
}
</script>
Step 9 And click on Save template button from top right corner of the screen.
How to use Pre code in Blogger Blog Posts?
We can easily use the pre
code in Blogger Blog posts. You should parse the code first after that you can
use it in your Blogger template. For parsing the widget code first use our pre
code parser tools from below link-
http://www.bloggerspice.com/p/pre-code-parser.html
Just copy the widget code
and paste it on our pre code parser. After that, click on Conversion button. And delete the <pre><code> from the
first line. And wrap the whole code by any code from below –
<pre class='code html'><label><i class='fa fa-html5 fa-lg'></i> HTML</label><code>
Add HTML code here
</code></pre>

<pre class='code css'><label><i class='fa fa-css3 fa-lg'></i> CSS</label><code>
Add CSS code here
</code></pre>

<pre class='code javascript'><label><i class='fa fa-code fa-lg'></i> JS</label><code>
Add JavaScript code here
</code></pre>
Now your code is ready for
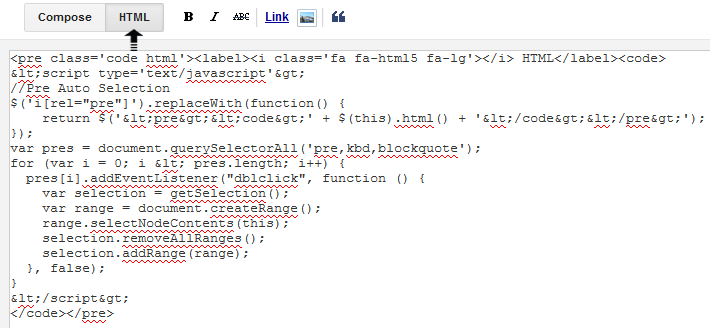
use in Blog post. For make this pre code work you have to add the code in HTML
view while writing a new post. From Post Editor Select HTML view. Now add the conversion
code. And again switch to Compose view and publish your post.
And see your Blog post
with pre code. It is displaying the widget code professionally. I hope you have
understood the tutorial, if you have any query regarding this then feel free to
write me.


9 comments
Let me explain this fault,I insert whole piece of code with carefully and save the template when I see my blog post it works great but there is no background Which i see in your demo picture.There is nothing happen only code appear and background is not installed.
So,What did I do ?
pre,code{font-family:'Open Sans';color:#46515e;}
pre{white-space:pre;word-wrap:normal;overflow:auto;}
<b:if cond='data:blog.pageType == "static_page"'> /* show in static pages */
Your css or javascript code here to show only in blog static page
</b:if>
</b:if>
i hope fix your problem :)
nice post , i say :D thank's
i has been followed your blog
its not working for me his massage look like this
Error parsing XML, line 3367, column 20: The content of elements must consist of well-formed character data or markup.
please helpe me thanks a lot.
amjad ali
It should be replaced with for (var i = 0; i (pres.length; i++) and save it, it will work
for (var i = 0; i < pres.length; i++) {
In this line it should be for (var i = 0; i (pres.length; i++)
http://www.bloggerspice.com/p/html-encoder.html