How to Set Custom Robots Header Tags safely in Your Blog?
Set Custom Robots Header Tags safely in Your Blog,
Robots meta tag and X-Robots-Tag HTTP header specifications,
How To Optimize Custom Robots header tags?
This is good news that Google has brought new feature on their blog called Custom Robots Header Tags. This will help to control and manage Google crawler to index and not to index certain section of your Blog.
Formerly we have to depend on Blogger and they decide what to index or not. But now this is became strongest feature of Google’s ON page SEO.

What is Custom Robots Header Tags?
Custom Robots Header Tags will help users to manage a blog’s
homepage, search pages, Achieve page and other posts. Suppose in Google search
engine certain pages indexed which one you don’t like to see. But after using
demotion tools from Google search console, still displaying the page links on
search engine.
In this case you can take help from Custom Robots Header Tags. Because if you wish to not index your specific page then just you have to select simple option by putting tick on it.
In case of many Blog you would see Contact us, Privacy Policy, disclaimer page, About Us page indexed as site link.
This is pointless. Because visitors don’t like to click on these page from search result. By the help of Custom Robots Header Tags we can remove some unwanted page link from site links such as Contact us, Privacy Policy, About Us.
However this is very sensitive things to set Custom Robots
Header Tags for our Blog. Because for any simple and silly mistake your site
links may disappear forever from higher (SERP) Search Engine Result page.
So you have to use the tags carefully. Because using Custom Robots Header Tags you should know the tags very well. You can see from below table that several valid indexing & serving directives can be use for the robots meta tag and the X-Robots-Tag.
So you have to use the tags carefully. Because using Custom Robots Header Tags you should know the tags very well. You can see from below table that several valid indexing & serving directives can be use for the robots meta tag and the X-Robots-Tag.
Safe Settings of Custom Robots Header tags in Blogger
After get well acquainted with all tags now we will set
the Custom robots header tags in our Blog. This is very easy. Just follow the
below steps-
Step #1: Log
in to your Blogger Account and Go to your Blogger Dashboard
Step #2: Click
on Now click on -> Settings -> Search
preferences->
Step #3: Now from Crawlers and indexing find Custom robots header tags and click on Edit link.
Step #4: An Option
will visible like Enable custom robots
header tags? And select Yes
radio button.
Step #5: And
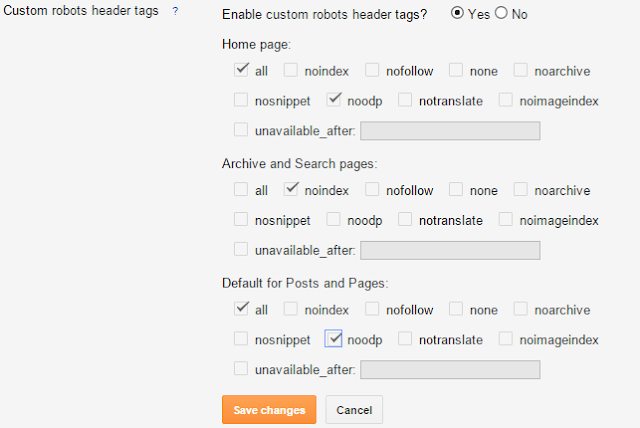
follow the image below to select safe settings from multiple choice options.
Step #6: After
selecting all option according to above picture press orange color Save changes button.
Now everything is done. You have successfully set and
enabled Custom Robots Header Tags in your Blog. Now you have full control on Google
crawler.
How to Use Custom Robots Header Tags in Specific Post or Page?
After generic settings you may want to change the settings
on specific Post or page. So for using this just go to any post or page and locate
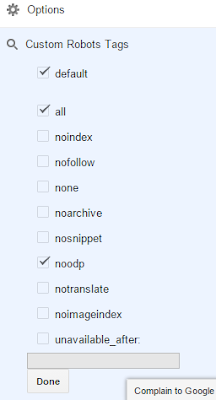
Custom Robots Tags. And now select any
option for that specific post or page. And after that click on Done button. That’s it.
Concluding Remark
This is really awesome feature for controlling Google
crawler and indexing page on search engine. Still developers are working hard
on it. However you must be careful about wrong option selection. Because due to
one mistake your page rank may drop from SERP. So follow this tutorial
carefully.


1 comment