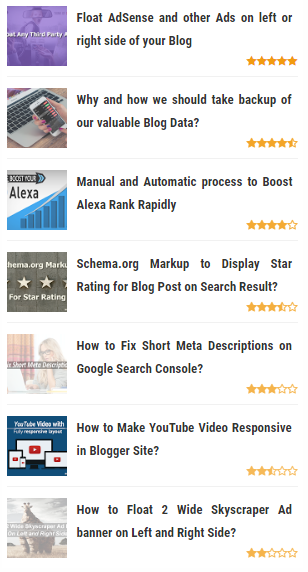
Popular Post widget with Star Rating for Blogger Site
How to add Popular Post widget with star rating on Blogger template’s Sidebar?
Rating
system is not supported in Blogger platform. But we can display rating by using
manual system. However in real rating system readers will rate a product or
widget by giving stars. Actually this work best in WordPress platform and
people can rate by voting on specific products and services. But many Blogger
platform users have regret that Blogger doesn’t support this awesome rating system.
But we can design widget by star rating in Blogger platform also but in real it
doesn’t take any vote of readers.
In
this post I am going to share a star rating popular post widget which will show
your Popular post widget with star rating. From my best knowledge first release
this widget By Arlina. But her widget has one major limitation that star rating
won’t able to show on more than 5 posts. So I have developed this widget and
brought some changes. Though Blogger allow to display 10 posts on Popular post
widget so this widget I have designed for 10 posts. As well as you can display
yellow and Blue star rating in your Blog. I hope you would love this widget.
How to Add Blogger Default Popular Post Widget?
Before
adding star rating in Popular post widget you must add it in your Blogger site.
So just follow the below steps-
Step
1 Log in to your Blogger
account and Go to your Blogger Dashboard
Step
2 Go to
your Layout tab.
Step
3 Click
on Add a Gadget then select Popular Posts.
Step 4 In configuration window check image thumbnail and uncheck snippet. Select 10 posts to Display.
Step
5 Now
click on Save button.
Adding Font Awesome File in your Template
We
know that Blogger doesn’t support star rating so we will display stars with
Font Awesome script. If your template already containing Font Awesome file then
just skip this steps. But if not then please follow the below steps to add Font
Awesome file in blogger template.
Step
1 Log in to your Blogger
account and Go to your Blogger Dashboard
Step
2 From Blogger
Dashboard Click on -> Template -> Edit HTML
Step 3 Now locate <head> by pressing Ctrl+F (Windows) or CMD+F (Mac)
Step 4 Paste the below Font Awesome code Below/after <head>
<link href='//netdna.bootstrapcdn.com/font-awesome/4.5.0/css/font-awesome.min.css' rel='stylesheet' type='text/css'/>
Step
5 And click Save template button from the top.
That’s
it you have just added Font awesome file in your Blogger template. Now we will
go for add star rating on our Popular post widget.
1. Add Popular Post widget with Blue Star Rating
We
have seen in WordPress platform Blue and yellow star ratings are widely using
for voting a content. So I will show you to add both star rating. However first
let’s go for adding Popular Post widget with Blue Star Rating.
Step
1 Log in to your Blogger
account and Go to your Blogger Dashboard
Step
2 From Blogger
Dashboard Click on -> Template -> Edit HTML
Step 3 Now Find this code ]]></b:skin> by pressing Ctrl+F (Windows) or CMD+F (Mac)
Step 3 Now Find this code ]]></b:skin> by pressing Ctrl+F (Windows) or CMD+F (Mac)
Step 4 Paste the below code Before/above ]]></b:skin>
/* Popular Post with Blue Star Rating by http://www.bloggerspice.com/ */
.PopularPosts ul{background:#fff;list-style:none;margin:0;padding:5px 5px 0;overflow:hidden;border-top:none}
.PopularPosts li,.PopularPosts li img,.PopularPosts li a,.PopularPosts li a img{margin:0;padding:0;list-style:none;border:none;background:none;outline:none}
.PopularPosts ul{margin:0;list-style:none;color:#64707a}
.PopularPosts ul li img{background:#fafafa;display:block;margin:0 10px 0 0;width:60px;height:60px;overflow:hidden;float:left;}
.PopularPosts ul li{position:relative;background-color:#fff;margin:0;padding:.7em 0!important;border:0;position:relative;border-bottom:1px solid #F1F1F1}
.PopularPosts ul li:before{font-family:fontawesome;content:'\f005\f005\f005\f005\f005';display:inline-block;position:absolute;color:#30AEE1;text-align:center;bottom:0;right:0;margin:9px 0;font-size:11px;padding:0;font-weight:normal;line-height:normal;transition:all .3s}
.PopularPosts ul li:nth-child(1):before{font-family:fontawesome;content:'\f005\f005\f005\f005\f005';}
.PopularPosts ul li:nth-child(2):before{font-family:fontawesome;content:'\f005\f005\f005\f005\f123';opacity:.9}
.PopularPosts ul li:nth-child(3):before{font-family:fontawesome;content:'\f005\f005\f005\f005\f006';opacity:.85}
.PopularPosts ul li:nth-child(4):before{font-family:fontawesome;content:'\f005\f005\f005\f123\f006';opacity:.8}
.PopularPosts ul li:nth-child(5):before{font-family:fontawesome;content:'\f005\f005\f005\f006\f006';opacity:.75}
.PopularPosts ul li:nth-child(6):before{font-family:fontawesome;content:'\f005\f005\f123\f006\f006';opacity:.7}
.PopularPosts ul li:nth-child(7):before{font-family:fontawesome;content:'\f005\f005\f006\f006\f006';opacity:.75}
.PopularPosts ul li:nth-child(8):before{font-family:fontawesome;content:'\f005\f123\f006\f006\f006';opacity:.7}
.PopularPosts ul li:nth-child(9):before{font-family:fontawesome;content:'\f005\f006\f006\f006\f006';opacity:.75}
.PopularPosts ul li:nth-child(10):before{font-family:fontawesome;content:'\f123\f006\f006\f006\f006';opacity:.7}
.PopularPosts ul li:hover:before{opacity:1}
.PopularPosts ul li:first-child{border-top:none}
.PopularPosts ul li:last-child{border-bottom:none}
.PopularPosts ul li .item-title a,.PopularPosts ul li a{color:#333;font-size:13px;}
.PopularPosts ul li a:hover{color:#2476e0;}
.PopularPosts .item-thumbnail{margin:0;}
.PopularPosts .item-snippet{display:none}
.PopularPosts .item-title{font-weight:700;padding-bottom:.2em;padding:0 5px}
Step 5 And click Save template button from the top.
2. Add Popular Post widget with Yellow Star Rating
You
may not like the Blue star rating because this widget merely used. So I am
sharing another script for adding Yellow star rating on your Popular post
widget. Please follow the below steps-
Step
1 Log in to your Blogger
account and Go to your Blogger Dashboard
Step
2 From Blogger
Dashboard Click on -> Template -> Edit HTML
Step 3 Now Find this code ]]></b:skin> by pressing Ctrl+F (Windows) or CMD+F (Mac)
Step 3 Now Find this code ]]></b:skin> by pressing Ctrl+F (Windows) or CMD+F (Mac)
Step 4 Paste the below code Before/above ]]></b:skin>
/* Popular Post with Yellow Star Rating by http://www.bloggerspice.com/ */
.PopularPosts ul{background:#fff;list-style:none;margin:0;padding:5px 5px 0;overflow:hidden;border-top:none}
.PopularPosts li,.PopularPosts li img,.PopularPosts li a,.PopularPosts li a img{margin:0;padding:0;list-style:none;border:none;background:none;outline:none}
.PopularPosts ul{margin:0;list-style:none;color:#64707a}
.PopularPosts ul li img{background:#fafafa;display:block;margin:0 10px 0 0;width:60px;height:60px;overflow:hidden;float:left;}
.PopularPosts ul li{position:relative;background-color:#fff;margin:0;padding:.7em 0!important;border:0;position:relative;border-bottom:1px solid #F1F1F1}
.PopularPosts ul li:before{font-family:fontawesome;content:'\f005\f005\f005\f005\f005';display:inline-block;position:absolute;color:#F29B10;text-align:center;bottom:0;right:0;margin:9px 0;font-size:11px;padding:0;font-weight:normal;line-height:normal;transition:all .3s}
.PopularPosts ul li:nth-child(1):before{font-family:fontawesome;content:'\f005\f005\f005\f005\f005';}
.PopularPosts ul li:nth-child(2):before{font-family:fontawesome;content:'\f005\f005\f005\f005\f123';opacity:.9}
.PopularPosts ul li:nth-child(3):before{font-family:fontawesome;content:'\f005\f005\f005\f005\f006';opacity:.85}
.PopularPosts ul li:nth-child(4):before{font-family:fontawesome;content:'\f005\f005\f005\f123\f006';opacity:.8}
.PopularPosts ul li:nth-child(5):before{font-family:fontawesome;content:'\f005\f005\f005\f006\f006';opacity:.75}
.PopularPosts ul li:nth-child(6):before{font-family:fontawesome;content:'\f005\f005\f123\f006\f006';opacity:.7}
.PopularPosts ul li:nth-child(7):before{font-family:fontawesome;content:'\f005\f005\f006\f006\f006';opacity:.75}
.PopularPosts ul li:nth-child(8):before{font-family:fontawesome;content:'\f005\f123\f006\f006\f006';opacity:.7}
.PopularPosts ul li:nth-child(9):before{font-family:fontawesome;content:'\f005\f006\f006\f006\f006';opacity:.75}
.PopularPosts ul li:nth-child(10):before{font-family:fontawesome;content:'\f123\f006\f006\f006\f006';opacity:.7}
.PopularPosts ul li:hover:before{opacity:1}
.PopularPosts ul li:first-child{border-top:none}
.PopularPosts ul li:last-child{border-bottom:none}
.PopularPosts ul li .item-title a,.PopularPosts ul li a{color:#333;font-size:13px;}
.PopularPosts ul li a:hover{color:#2476e0;}
.PopularPosts .item-thumbnail{margin:0;}
.PopularPosts .item-snippet{display:none}
.PopularPosts .item-title{font-weight:700;padding-bottom:.2em;padding:0 5px}
Step
5 And click Save template button from the top.
Now
check your Blogger template and see the star rating on your Popular posts
widget. This is really cool. And I am sure your Blog readers will love to see
it. Overall it will increase a positive impact on your Blogger site. Thank you.


13 comments
HTML is the base any Widget and
CSS is for giving new design and shape on it. so both are required.
I just use simple CSS for modifying the Blogger default popular post widget.
The icons "Font Awesome" load faster than CSS Sprites?
:sp
Le premier code est pour le post populaire de style de couleur bleue.
Rating Plugin WordPress